
A round-up of fantastic ways to make biographies and history study come alive.
Read MoreWhat I wish I'd known when I started homeschooling.....
When I started home schooling I had a really REALLY hard time with letting go of all that fun. I didn't want to move on from that part of our lives. So, I started out trying to straddle both worlds. We would play all morning and I would work school in somewhere in the afternoon.
Read MoreMake Spelling Fun!
I go a bit overboard with spelling because I am such a bad speller myself. I thought spell check would always be there for me but it isn't. Not learning how to spell correctly has been one of my biggest regrets year to date. It has been the source of embarrassment to me countless times. Take it from me: Learn to spell!
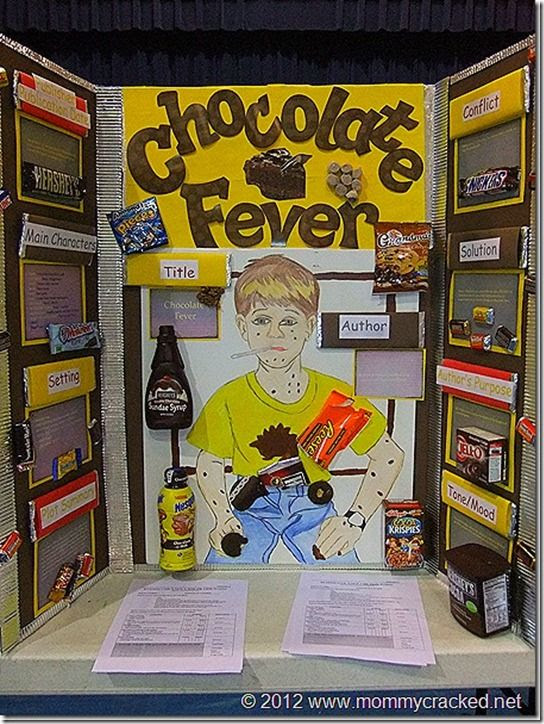
Read MoreCharlie and the Chocolate Factory
This is the first book we have read where I actually had the blog in mind as I read it. If you have not read Willy Wonka in class you are in luck. If you have, you may just want to read it again after this post. Yes, it's just that good.
Let me start by saying that I did not do every single thing on this list and I don't expect you to do so either. We all come with different talents and different interest so with that in mind, choose what would suite your family the best.
While reading Charlie and the Chocolate Factory I thought of activities for several of the chapters that you can choose from. As you read the book, you will see how they fit with the story. I'm telling you this list is amazing! No modesty here ;-). I wish there were a website made of just these lists. Here is the incredible list so that you can also dream of such a website:
Ch. 1: Volunteer at a food bank or shelter, donate food (sometimes they have collection boxes at the doors of grocery stores), make up food bags for the less fortunate and (with parents permission) give them out to homeless on the corners or buy a few $5 gift cards for fast food to keep in the car to hand out. This is a great opportunity to give a pass along card, by the way. Or, Option B: really sacrifice and make/eat cabbage soup for lunch! ;-)
Ch. 2 & 3: Design your own Chocolate Factory! Use food, play dough, legos---get creative! Make it 3D!
Ch. 4: I looked in 3 stores to try to find a chocolate bar that you actually unwrap with paper but couldn't find one. I wanted J to open a golden ticket but that just didn't happen. So instead....Option B: design and make your own chocolate bar yourself! What would you put in it? My mouth waters just thinking of it!
Ch. 6 & 8: Act out the kids as the tickets are discovered. I loved acting like Veruca---I mean J loved acting like Veruca. I'm a respectable... ok, ok, it was me. I pretended to be Veruca- happy now? And it was fun, too!
Ch. 10: Go for a walk and look for money on the ground. It's a long shot but you never know. Plus, exercise is good for the soul.
Ch. 11: Make your own golden ticket. There may even be a template already out there. Use a JoAnns or Hobby Lobby coupon and buy gold scrapbook paper. I would think 1 sheet could make 6 tickets and each sheet is about $.60 regularly. Print off the tickets your kids design. If they are too young to use a computer, use a Sharpie and watch them closely.
Ch. 14: Have kids practice their 'mental imaging' by first picturing then drawing Willy Wonka based on the description in the book. Hint: He doesn't look exactly the same as he does in the movie so the kids need to pay close attention. Side note: The Oompas look VERY different in the book than in the movie. It might be fun to look up images of the movie to compare.
Ch. 15: Drink some chocolate milk or hot cocoa together while reading this chapter. This sounds like a journal prompt to me: What would you do if you had a chocolate waterfall in your home?
Ch. 16: Dress up like the Oompa Loompas. The one in the movie would be more fun in my opinion.
Ch. 17: Make some fudge. Option B: Make up a song or two- like the Oompas do! This would be a great keepsake if written down.
Ch. 18: Design your own boat. Make it out of anything. For some reason a bar of soap comes to my mind. How about butter or mashed potatoes? Think about it, "What did you do in school today?" "I made a boat out of mash potatoes." COOLEST. TEACHER. EVER.
Ch. 19: DIY Gobstoppers. In the book they are described as green marbles- more like the ones sold in stores now. The ones in the movie were way cooler to make (that's my library # taped to the top of my computer):
This might be a fun time to explore the candy isle {only} searching for Willy Wonka Candy. There isn't much in comparison.
Ch. 20: We made pretend flavors of gum with playdough such as yellow with blue stripes or pink with red dots. Have you ever made snozzberry flavored gum? By the way, I bought a pack of 6 or 8 colors of playdough at the Dollar Tree. It was much cheaper then trying real flavors (and our teeth thanked us).
Ch. 21: Eat some blueberries while reading.
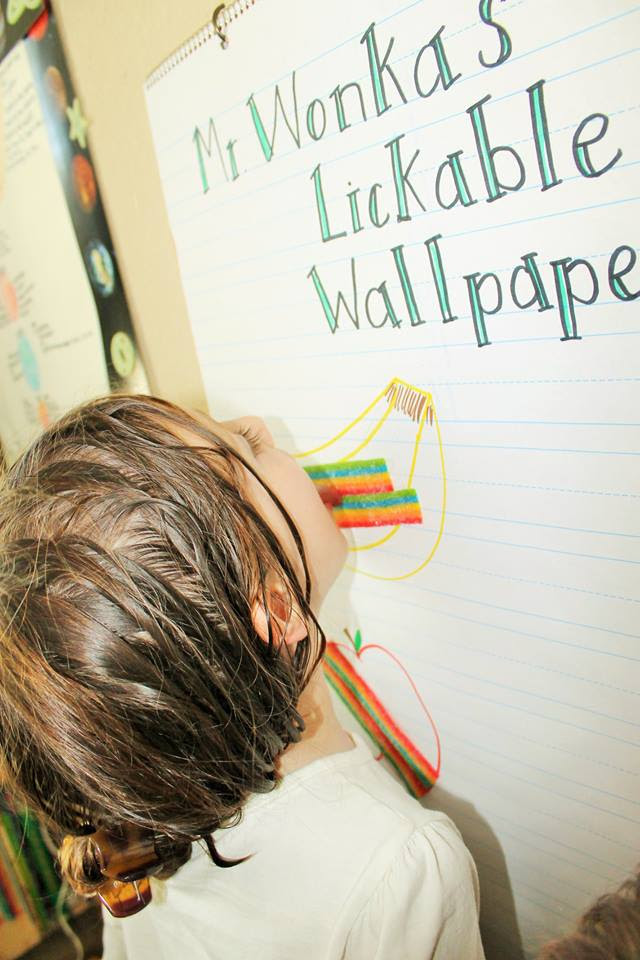
Ch. 22: DIY lick-able wallpaper, fuzzy juice (Aka rootbeer floats), or marshmallow pillows. Here is a recipe link.
Ch. 24: Eat some nuts while reading. Confused? In the book Veruca is a bad nut- not a bad egg. Personally, I think she was the worst kid and she got off the easiest.
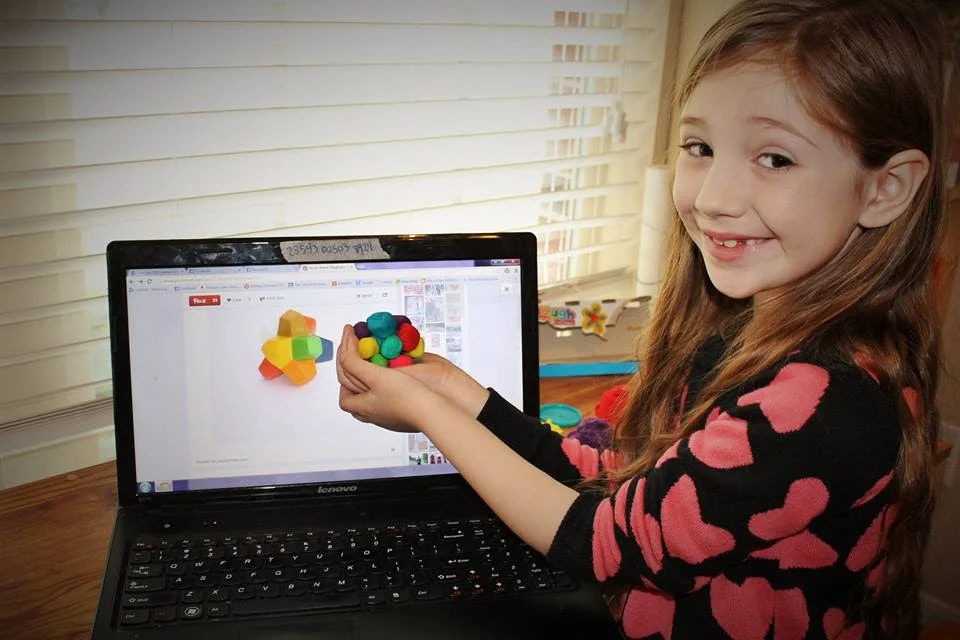
Ch. 25: Design a glass elevator. I'll admit, I don't know how I would do this so please if you do send me pictures! Go ride in a glass elevator if you know where one is located. Look up google or pinterest images of glass elevators. They are beautiful!
Ch. 26: Make dark glasses. Let's cheat with this one and use the same idea from the Wizard of Oz.
Ch. 29: Draw before and after pictures of the kids who visited the factory and compare. In the book you get to see them come out of the factory.
I truly hope that this post (and perhaps my past post) have opened your eyes to how simple and fun hands on learning can be. If you try these things at home while reading Willy Wonka I really would love to hear from you in the comments below. If you have more ideas to add to this list- I'd love to hear them, too. Remember that you can look up images of the movie or watch clips on youtube throughout. There are also some great quotes and useless facts about the movie you can find. We watched the movie first and I often spotted exact lines from the book used in the movie. Have fun!
Hands on Reading
Yes, you read that correctly. This post is about hands on reading. It is possible! I love to read and a great way to help inspire your children to enjoy reading is by making it totally awesome.
The Wizard of Oz

"Because if you do not wear glasses the brightness and glory of the Emerald City would blind you." He opened a box filled with green tinted glasses of all sizes and shapes. He fitted them all with a pair; even Toto. -Wizard of Oz
As we were reading Wizard of Oz I was doing my usual 'print out a picture of the characters for J to color as we read' routine when I came across this. It was a light bulb moment for me. I can make reading hands on? Wow.....
I came across this and thought it would be great. Visual plus hands on! What a fantastic way to retell stories! Now we use the 'Yellow Brick Road Method' after all our stories.

There are tons of different ways to do this if 'Yellow Brick Road' is not for you or if, like us, you thrive on variety. Here are some other ideas:
Hands on reading ideas galore!


Instead write questions like: Who was your favorite character and why? Are you like him/her? How? What is the setting? Would you like to be in this story for real? Describe the villain. What do you think will happen next? How does _________ make you feel?

You may also like this.
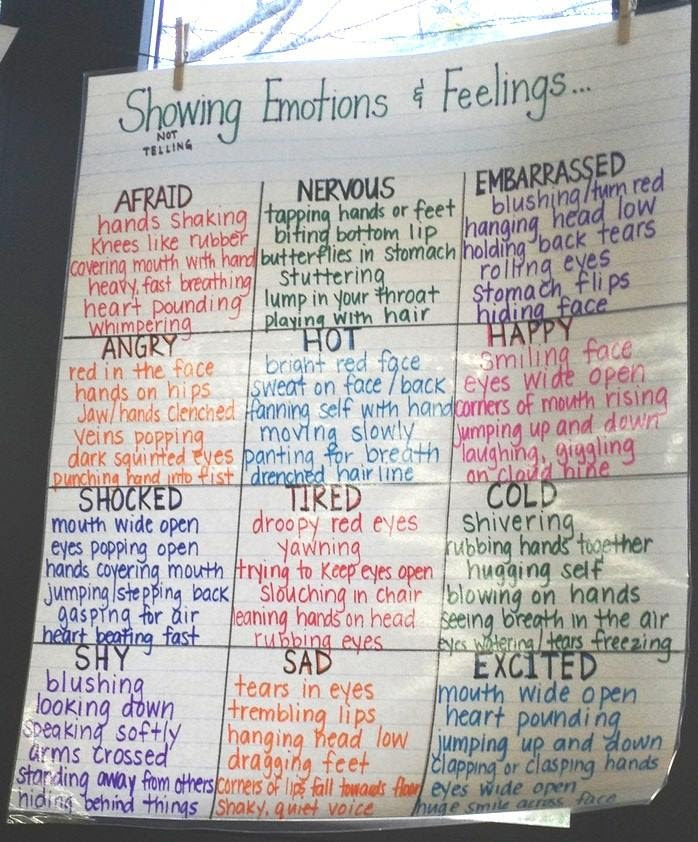
I saw this recent post that focused on emotions. Click to view.

What I would do with a retelling rope is have a pre-knotted rope like you see above. Have children draw pictures to represent the knots. For example, draw or color a printed picture of a forest and then tape it to that area of the knot. You could use ribbon and Velcro if that's what you have on hand.
James and the Giant Peach
For this book I chose to focus on each character. As you can see we wrote about each one as they were introduced in the book. Then I printed out pictures via google search. Then I drew some and J drew some and she colored them in. It was easy.
I have a friend who lets her kids pick out one 'topic' to listen for and highlight as they have family scripture study. One son chose food. Every time food is mentioned as they read he highlights it in green. Another chose animals. Any time an animal is talked about, it's highlighted in orange. Older children may choose harder concepts like service or miracles.


You may be surprised to find how often books talk about food. This is a great way to incorporate hands on learning in reading! Plus after you have made it, let the kids eat while you read. I find that's one of the best times to read to kids.
Host a Reading Fair
I am actually throwing one of these shin digs for my home school group at the end of the summer to encourage summer reading.
Check your local library to reserve free rooms for your event.
Let me know if you do it!
Follow this link to help you get started.
As always, I leave you with a quote:

Stay tuned for next week when I will be sharing our latest and greatest reading adventure!
Happy Reading!
Semester of Science: The Human Body Part 3
You made it to round three! I'm so happy! This one will be awesome. You'll see. Today's post is going to complete our Human Body series. I will continue by giving you even more hands on science experiments to do with your kids. So, put on your goggles and lab coat and let's get started.
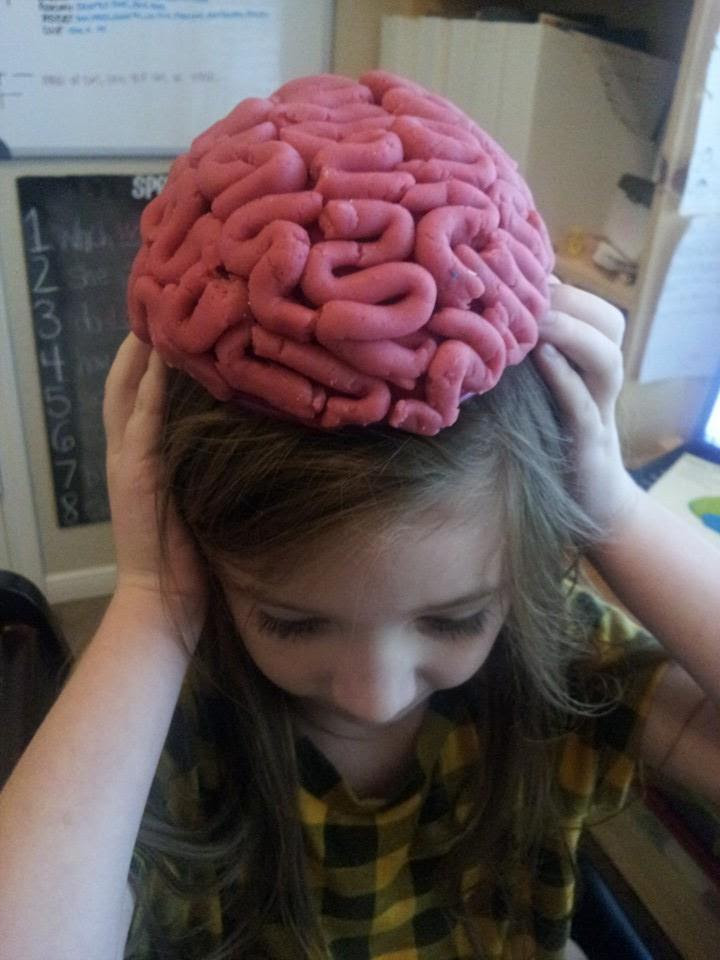

This picture got a lot of likes on my facebook page and it was really the easiest experiment to do. You need two things: red or pink play dough and a bowl. First you get a small bowl. The larger the bowl the more brains you will have to make. Maybe you want to be ambitious and use a bowl that will fit your child's head, go you! Next, Cover the bowl with the play dough since some of it will show through. Then, roll the remainder play dough into snakes. It doesn't matter how long your snakes are. You will need a variety of sizes but they all should be about the same thickness. Start by bending the snakes into S shapes. Take a look at the pictures to get a general idea. There is no wrong way here. The hardest part is getting the snakes to stick well enough on the bowl. If you wanted to, you could try gluing them. It took days for mine to harden and then pieces would fall apart. I wasn't really expecting it to last too long so it was not a big deal to me. If you want to keep yours, maybe try modge podge glue over the whole thing when you finish. If you have a suggestion that worked for you and want to share with others, leave it in the comment section below.
Here is the link I used for the idea though I simplified it. The brain was originally listed as a Halloween decoration! Double uses here people!
Here is a link for DIY play dough but since cream of tartar costs just as much as buying ready made play dough, it may not save you money if you are only making one. I think one can of play dough per brain should be enough if the brain is not too big. Also, there are tons of different recipe ideas if you want to make things like Chocolate or cotton candy play dough.
Here is another activity we did for the brain.

I drew an outline of the brain myself and then sectioned it off. It may be easier to print it out. Use card stock if you want to use play dough. Otherwise you can just color it in. Here are some additional ideas that go along with learning about the brain.
Lets see, what else did I promise from last week... Oh yeah, lungs!

Here is the link I followed from Pinterest.
This lung experiment took more planning than I wanted but still it was easy enough. I took a video of it to show people on my phone when they ask about home schooling. Yeah, I'm bragging to them but now you can do the same thing! Aside from the .75 fake sprite I bought, (my kids were in Heaven or maybe just a sugar high) it was made with things I had around the house. Yes, I do keep balloons around my house. I actually have a kid that I babysit who looks forward to getting balloons at Sis. P's house. I'm like the cool aunt! Make sure you use non bendable straws. I didn't cut two holes in the lid of the bottle as the directions from the site said- too hard. Instead I put tape around the straws nice and snug. I used rubber bands to secure the balloons to the end of the straw. The directions also said to use a big balloon for the bottom of the bottle. You know, the kind with the rubber band attached that you bang back and fourth trying to annoy your brother with? I didn't have one on hand, though you can get them 3 for a dollar at the 99 cent store, so I used a plastic grocery store bag. Anyone else have a bag filled with other bags living under their kitchen sink? I put a rubber band around the bag to hold it tight as well. Then just blow into the straws and you have lungs! Perfect unexpected side effect: one balloon often would get bigger than the other. Did you know the left lung is smaller to make room for your heart? We always made sure the smaller one was on the left by turning the bottle upside down if we had to. Coincidentally I drew the left lung smaller on my human body chart by accident. Bonus!

The digestive system surely has more experiments to choose from. I wasn't too thrilled with the outcome of this one, though I do think it teaches the topic very well and lots of websites have this experiment listed when teaching this concept. Here is a link that shows something like what I did.


I got a gallon sized Ziploc bag and filled it half way with water. I think vinegar and a little green food coloring might have been better to show that our tummy is full of stinky (but totally helpful) acid and in my imagination that acid is green (resist the erg to google it). I used an empty paper towel roll as the esophagus and as you can see in the picture above J put it slightly in the bag without getting it wet. Then we fed it bread. Something more colorful like cheese may have been more visually stimulating.
After that J used her hands to act as the muscles in our stomachs to break the food down ready to enter the intestines. We learned about the intestines on a different day though it could go along with learning about the stomach since it all makes up the digestive system. This day, however, was focused on the stomach and what goes on there.
Since I'm not super enthusiastic about this one I'm giving you a bonus link that looks very nifty to try. Give THIS life size looking digestive maze of awesomeness a go.

You can always make a Tee Shirt. It seems a bit strange, but it's sure to be a great conversation piece at any home school function. It would also be great reinforcement if you challenged the kids to tell about the digestive path anytime someone asked about the shirt. I can't even look at this shirt without laughing. I'd love to see a picture of one of my readers wearing their original digestive system shirt! You would totally rock in my book.

I'm going to end my Human Body Series with the nervous system. This was SO simple and really neat, even for me. By now I hope you have partaken of the awesome sensation of going back and fourth between a hot tub and a swimming pool. It really stuns the nerves system. That is this experiment on a giant level. We want to make it portable and able to fit on your table top. You start with 3 bowls. In bowl 1: Ice water. Bowl 2: room temperature water. Bowl 3: hot water of the non flesh burning variety. Have the student place one hand in the ice water and the other in the hot water. Keep submerged for 1 minute (3 if they have been bad that day ;-). Then place both hands in the lukewarm water. The hand that was in the ice is now very warm while the hand that was in the hot is now chilled. Easy! By the way, if you are following along on your Human Body Chart from Part 1, we colored in skin for this experiment.

Ok, so I couldn't find the link where I got this idea but It's simple enough to follow the steps above I hope. And I'm also giving you THIS link for an optional idea to choose from.

The human body is amazing! I didn't cover every topic we learned in our semester at home, or that is listed on the human body chart I made, but I have faith that you can come up with some one your own. Also, there is no rule that says each topic must have an exciting hands on experiment. If you comment with your email address I have an overwhelming list of resources I can send to you on the human body. I really think that this semester could be done inexpensively. To conclude this topic for now, I'll leave you with some books I kept on hand. If you have suggestions- post them in the comments below.
Thanks for reading!


Semester of Science (Human Body) Part 2....
Welcome back to another installment of "Hands on Semester of Science - The Human Body." In part one, I showed you a simple human body chart that kids can color in as they learn about different organs. Today we are going to start getting into the experiments {insert mad scientist laugh}. It might be cool for the kids (and you) to invest in some cheap science tools such as a lab coat, gloves and goggles if you plan to do several experiments. Hey, that stuff is considered hands on in my book.
Let's get started with Dem Bones.
If I need an idea I always start by looking on Pinterest. When I saw the following experiment I had my doubts. It turned out so cool and I ended up keeping the hand until my son took a bite out of one of the fingers and it attracted ants. Who knew ants liked flour? Who knew L wondered what a fake hand would taste like?

Here is what you do:
- Step One: Get a glove from the dentist in your ward. That's a joke people. Not every single ward has a dentist, just most ;-). You can get a glove from fast food places or beauty salons too. If you must buy them, you can get them at Walmart and I'm sure there are lots of fun and educational things you can do with them. I may even do a post some day called 'Ways to teach with Latex gloves'. And yes, try to get the latex type since it has more of a flesh feel to it than the plastic see through ones.
- Step Two: Get five large flat Popsicle sticks. You can get these from the doctors office for free if you ask nicely. I'm sure there are other places you can get them for free but again, these are always good to have on hand for future use and are not very expensive. Ideas may one day appear in a post labeled 'Ways to teach with Popsicle sticks'. Getting back on track... place the sticks inside of the gloves where your fingers would go. Last step: Fill your glove with flour. It doesn't take much but you do want it packed well. Then tie the glove at the bottom. Your done. My 6 year old was able to do this almost completely on her own. I held the glove open for her to dump in the flour (do this part over the kitchen sink for easy clean up). When it's complete it really does feel similar to a human hand! Seriously! Here is the Pinterest link that I followed for my Bones class experiment.
Side note: I love most Steve Jenkins books. The book with the big skull and the red background is a great one of his! Try your library first but I personally think his books are worth investing in. While libraries are a fabulous resource (most home schoolers visit on a weekly basis), may I suggest investing in a few well rounded, kid friendly books on this topic. I say kid friendly but I really mean books that you can understand, too. If it's over your head, it's guaranteed to be over your child's. I went to a used book store and browsed their human body section to find mine. I also borrowed from the library first to make sure the book was worth buying.
Another favorite experiment of ours was making our own blood.
This idea also came from Pinterest:
I save my glass jars for no good reason but every once in a while I'm glad I did. This was one of those rare times.
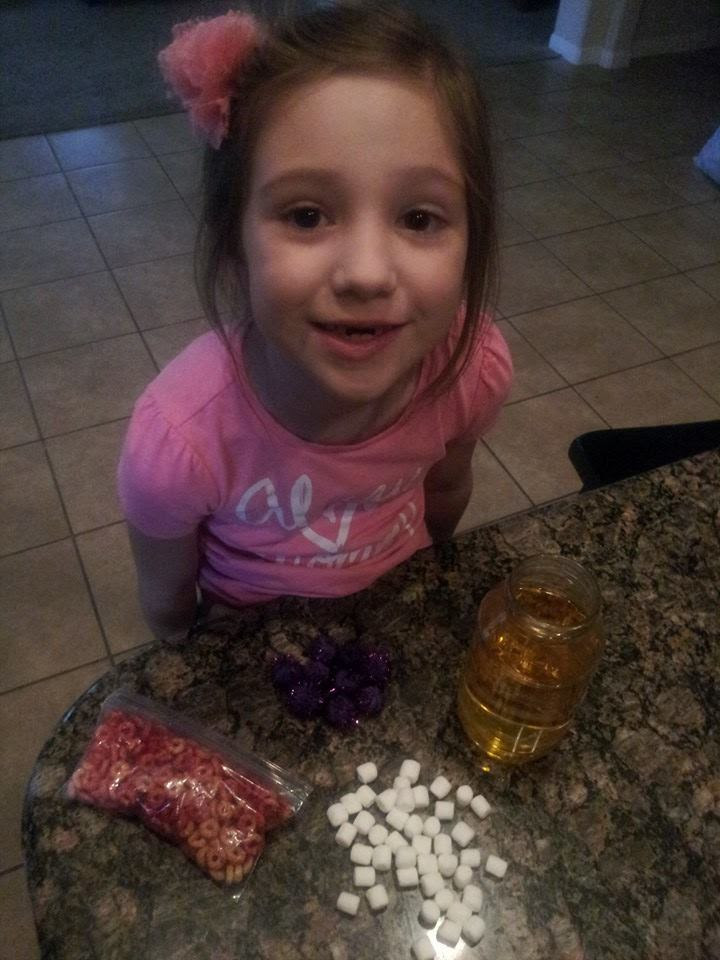

Step 1: You will need a glass or plastic jar filled 1/2 to 3/4 full with water plus yellow food coloring. This represents the plasma. Next get a couple of hands full of mini marshmallows- one for project, one for eating. These will be your white blood cells. I used purple pom poms as my platelets. Last I mixed Cheerios with some red food color in a small Ziploc bag for my red blood cells.
Add all your ingredients one at a time while talking about why each one is important-- well, you know the drill. Teach!
In the end your blood turns red from the red blood cells. Since blood really does look red when you bleed and not like yellow plasma this made more sense to J.


Last one I'll show you today
is on the backbone.
You may notice in my picture that J's back bone is lacking a few gummy life savers. I bet some of you guessed it: L struck again! Maybe I should feed that kid more. I did find both a somewhat edible versions of this experiment which I went with HERE or HERE is another option to use for the backbone with a pool noodle:

Here is how you make this back bone:
Gather your whopping three materials. By now you are realizing that I usually go pretty cheap with my hands on learning and you love me a little more. You will need a piece of rope (spinal cord), some cheerios or maybe wagon wheels (bones) and a large pack of gummy life savers (disk). The non food version is probably more visually accurate but I made this in the fall so there were no pool noodles to be found at the Dollar Tree. You see above in the photo J is putting the lifesavers and the Cheerios on alternately. Make sure you have counted enough bones (33 for kids and 24 for adults). Kids will remember how many backbones we have if they are counting them as they are added.
I previously told you that my daughter likes to color and does really well at listening while she does it. I invested in the Dover Human Body coloring book (pictured at the top of this post) which is very educational and filled with a lot of information and details. Details take a long time to color which equals a long time for me to teach about the subject which means my child will have a better chance of learning something. That's just a theory and only true when the child is in the right mood ie: the wind is blowing to the east, it's high tides and.... just kidding. I don't think we were able to get the full use out of this coloring book but maybe you would. Here is the link so you can look into it. If you're not positive that you would use it, do a Google search for whatever organ you are learning about and print a color page instead.
That's it for this week, folks. Stay tuned for Part 3 when our "Semester of Science - The Human Body" concludes with experiments about the brain, lungs, intestine and nervous system.
What would you like some "hands on" ideas about? Drop me a line in the comment section below or email me bethany@lds-nha.org.
Semester Of Science (Human Body) Part 1
Howdy everyone! Welcome to my first blog post about hands on learning. Jump over and read my bio for more information about me and why I'm writing about this special learning tool.
I thought I'd start you out with a bang for my first few blog post by giving you a semester of science. When my daughter, Jillian (now 6), started showing an interest in science at an early age, I was kind of worried I would not be able to meet her needs. I may have even been dreading it a little bit. I'm sure you can relate, even if it's not science that gave you a scare, maybe it was math (for me it's only math now). I believe my past science teachers would all be surprised to learn this about adult Bethany: I am totally in love with science! I'm not sure what is different now then when I was in school but I am so interested in the topics I am teaching. Doesn't it make school so much more fun to teach if your learning, too? Anyway....
The topic of the Human Body has been fascinating children since the beginning of time. Ok, I don't have proof that's true but I wouldn't be surprised to one day learn that Adam and Eve taught their kids about guts and body functions. Surely kids way back when asked their parents where poop comes from. Don't be squeamish, people. We all wanted to know at some point. For some reason kids really want to know what is going on under their skin. The great thing is, I have some very cool experiments and ideas you can do at home to teach your kids all about the human body. Let's start simple.
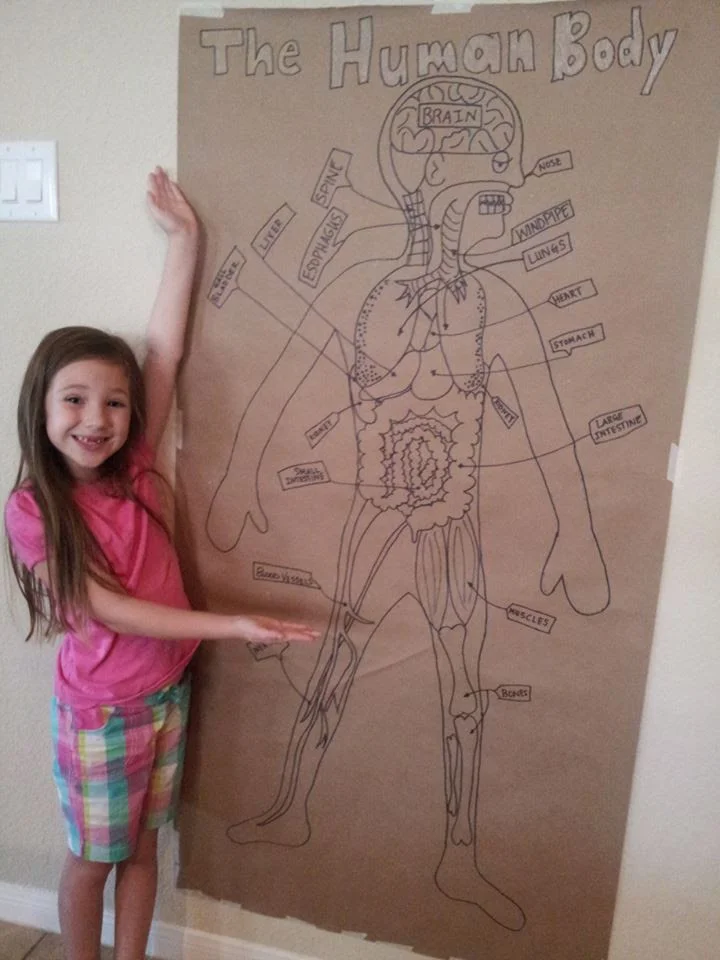
If you look in the back of the book: The Magic School Bus: Inside the Human Body, you will find the inspiration for my human body chart.

Let me tell you how I made the coolest chart you've ever seen (hey, I know you were thinking it). This background is a roll of mailing paper (found at Dollar Tree and Walmart near the mailing envelopes section). I rolled the paper out and had J lay on it then cut it to size across the top. I trace my kids on the trampoline with side walk chalk a few times a month so it was simple enough to trace around her using a pencil. I did have to erase or else her right leg would have been about as thick a ruler but that's why I used pencil first, right? After corrections were completed, I used a black sharpie to trace the pencil markings. Being a bit of a perfectionist I turned the paper over and followed again with the sharpie (it showed through from the back) so you couldn't see the eraser marks. I did this with all the organs and such which I'll admit did take all the artistic abilities I claim to have and also doubled the project time. It may not be worth the effort for you, do whatever you feel comfortable with. As I was working on my chart I turned on Netflix and let the kids watch The Magic School Bus: Inside the Human Body. Yes, they did get to watch it twice since I chose the hard perfectionist way. Option B: If you are already saying to yourself: No way could I draw this! Never fear you can simply do a google search to print out organs and glue them on.

What makes this hands on learning? As we learned about each topic we colored them in. That's it. Simple. You see, J loves to color and I've realized if I give her something to color as we are learning she does a much better job at paying attention. It's true, give it a try! It works great with History.
You will notice in the next picture I added the bladder since J specifically asked about it. Customize it all you want. You may also notice that I got a better camera since starting my human body chart (yahoo!!). Perhaps you spot the brain on the shelf as well. We will get into that project too in the coming week(s) as we get more into experiments and such. So, here it is, the finished project . . .


Let me know if you take this on! I'd love to see your super cool human body charts as well. Stay tuned for next week's 'Semester of Science (Human Body) Part 2'.
"God did not put us on earth to fail but to succeed gloriously," - Richard G. Scott.